Delectable Arts

appreciating the tastier things in life


2 Comments

Silicone Baking Mats FTW!

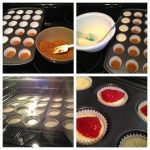
I bought my first silicone baking mat a while ago, and I LOVE IT!

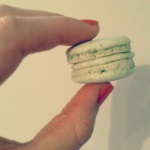
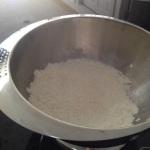
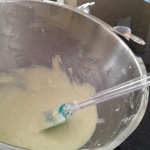
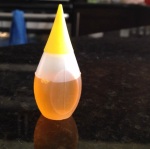
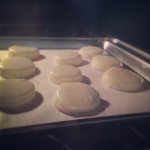
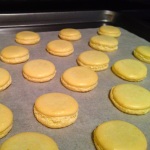
Initially, I wasn’t sure if I wanted to “invest” in one, but now I have no regrets whatsoever. (As a matter of fact, I’ve purchased a second one since then.) Thus far, I’ve only tried baking french macarons with my fancy-dancy silicone baking mat. I find that the mat really evens out the distribution of the heat in the oven such that each macaron turns out consistently, and you don’t get the lopsided macarons that sometimes occurs when you use parchment paper. However, I do find that I need to leave the macarons in the oven for a few minutes longer, which isn’t a big problem as long as they come out looking perfect. So, here’s my breakdown of the pros and cons of baking with a silicone baking mat:

Pros

  • Even distribution of heat which allows for consistency.
  • They’re reusable, which means they’re eco-friendly.

Cons

  • The baking mats can be quite pricey depending on where you buy them from. I recommend checking on eBay – some silicone baking mats that I’ve seen on eBay even have circular imprints on them so you know how much batter to pipe.
  • You need to leave your baking in the oven for a few minutes longer, but that’s really not a huge setback.

Have you tried using a silicone baking mat? What did you think of it?


1 Comment

Blueberry Banana Bread

I really love banana bread, but I find it disappointing when the store-bought ones are often dry and don’t taste like there’s much banana in them. Also, the store-bought ones can sometimes taste too ‘buttery’ for my liking. I prefer making my own banana bread because I know what I’m putting in it. I find that plain ol’ banana bread is kind of boring, so I add blueberries in my recipe.

The recipe below makes a very moist and dense blueberry banana bread. Everyone who has tried my blueberry banana bread says they love it!

blueberry banana bread

blueberry banana bread

 Ingredients

  • 3/4 cup fine sugar
  • 3 tbsp unsalted butter (room temperature)
  • 2 large eggs
  • 2 ripe bananas
  • 3/4 cup fresh blueberries
  • 1 tbsp milk
  • 1 tsp vanilla extract
  • 1 tsp cinnamon
  • 1 3/4 cup flour
  • 1 tsp baking powder
  • 1 tsp baking soda
  • a dash of salt

Directions

  1. Preheat oven to 325°F. Lightly grease a loaf pan.
  2. Beat butter and sugar with an electric mixer on low speed until creamy. Add eggs one at a time and beat well after each addition.
  3. Mash the bananas, and then add milk, cinnamon, and vanilla. Mix well and scrape along the inside of the bowl as you mix.
  4. Add the banana mixture to the creamy mixture and stir to combine. Add salt, flour, baking powder, and baking soda, and then mix well.
  5. Pour 1/3 of batter into the pan, then evenly distribute 1/4 cup blueberries on top of the batter. Repeat until all the batter and blueberries have been added to the pan.
  6. Bake for 1 hr and 30 minutes or until a toothpick inserted comes out clean. Cool for 20 minutes and then remove the bread from the pan. Allow the bread to cool completely.


TIP: The bread is best served slightly warmed and with a light drizzle of honey.


1 Comment

Single-Serve Crème Caramel

Several years ago, I got this recipe from a family friend. However, they weren’t willing to fully reveal the entire recipe, thus I’ve had to experiment many, many times before I finally figured out the correct portions and oven temperature. I love this recipe because it’s simple and inexpensive to make. Since this is a single-serving, you can bake this in your toaster oven.

This is also a gluten-free recipe for all my friends who have gluten allergies.

crème caramel

crème caramel

Ingredients

  •  4 tbsp fine sugar
  • 1 large egg
  • 110 mL whole milk
  • 1/4 tsp vanilla extract
  • 3/4 tsp water

Directions

  1. On medium-low heat, warm up milk in a small saucepan. Slowly add 2 tbsp of sugar and stir until the sugar has melted. Remove from heat. (DO NOT BOIL THE MILK.)
  2. In another small saucepan, cook 2 tbsp of sugar with 3/4 tsp of water. The water will evaporate and the sugar will eventually burn and melt into a thick, golden brown caramel. Quickly pour the caramel into a 10 oz ramekin.
  3. In a small bowl, gently beat the egg and vanilla extract until well blended (about 10 seconds). Remove excess foam with a tea strainer.
  4. Pour the cooled milk into the egg mixture and stir gently.
  5. Pour the milk and egg mixture into the ramekin, over the hardened caramel.
  6. Bake at 325°F for 20 minutes, then turn the temperature down to 275°F and bake for 25 minutes.
  7. Remove from heat. Once the crème caramel has cooled to room temperature, place it in the fridge overnight and serve chilled. Remember that the caramel sauce is hidden at the bottom of the ramekin.


crème caramel

crème caramel


1 Comment

Salted Caramel French Macarons

I have a confession to make… I hate making my own caramel sauce.

So, I use the store-bought caramel sauce because it’s cheap and convenient. I don’t think it makes sense to make a mess in my kitchen to make something that I can buy easily. I did the math in my head and realized that it costs about the same to buy caramel sauce vs. making it at home.

I’m not sharing a recipe this time as there are plenty of great salted caramel french macaron recipes available on the interwebs. I just want to say that there’s no shame in cheating when it comes to baking. It’s all about the noms and these macarons are mega noms.

Happy noming.


3 Comments

Strawberry White Chocolate Cheesecake Bites

This recipe is for 24 mini cheesecakes.

(Adapted from this recipe from www.thatskinnychickcanbake.com)

Ingredients

Crust:

  • 2 tbsp butter (melted)
  • 2 tsp fine sugar
  • 3/8 cup graham cracker crumbs
  • pinch of salt (NOTE: omit the salt if you’re using salted butter)

Filling:

  • 1 pkg cream cheese (softened)
  • 1/4 cup fine sugar
  • 1/4 tsp vanilla extract
  • 2 tbsp white chocolate chips (melted)
  • 1 large egg

Topping:

  • 1/4 cup white chocolate chips (melted)
  • 24 fresh strawberry slices

Directions

  1. Line a mini cupcake pan and preheat oven at 315°F
  2. In a small bowl, mix cracker crumbs, butter, sugar, and salt to make the crust. Spoon about 1 tsp of crust into each cupcake liner.
  3. In a medium bowl, beat cream cheese, sugar, and vanilla with a handmixer on low speed until blended. Don’t overbeat the mixture.
  4. Add the egg to the mixture and beat on low speed until blended.
  5. Slowly pour the melted chocolate into the mixture and beat on low speed until blended. Scrape along the side of the bowl to ensure that the ingredients are blended well.
  6. Pour the mixture over the crust, distributing evenly among the cupcake liners.
  7. Bake for about 16 minutes, rotating the pan halfway through.
  8. Let the cheesecakes cool before adding the toppings. Pour a few drops of melted chocolate on top of each cheesecake, and then add a slice of strawberry on top.
  9. Refrigerate before serving. (Or freeze the cheesecakes if you don’t plan on serving them within the next 2 or 3 days.)


Leave a comment

Macaron Wars: Episode II – Attack of the Hollows

As I continue to master the macaron, something strange (and terribly annoying) started happening – I started getting hollow macarons! <Insert sad face here>

I don’t know what exactly changed. It could be that the weather fluctuates so much in my city which causes rapid changes in humidity (which affects baking, or so I’m told). When I first started baking french macarons, they were just right. My macarons were full and chewy on the inside, and crisp on the outside.

But then, one day, I started getting hollow macarons. The large pocket of air inside each macaron made my macarons very fragile. My poor hollow macarons lacked the full, chewy goodness that macarons are supposed to have.

I researched this problem and found out that I’m apparently not the only person who has encountered this annoying issue. Many bloggers have documented this issue and have found their own ways of troubleshooting it. I’ve tried some of their troubleshooting tips, and after four attempts, found a way to deal with the hollow macaron fiasco that was occurring in my kitchen.

Here are the things that I started doing differently:

  • Use a stainless steel bowl to whisk the egg whites and sugar, instead of using a plastic bowl. Plastic bowls are porous, thus they don’t allow the meringue to reach its full volume.
  • Add just a pinch of cream of tartar to the egg whites before whisking. This will stabilize the meringue.
  • Cut down on the whisking time. Instead of whisking the egg whites and sugar for a total of 5 minutes, I cut the time down to 3 minutes, thus whisking in less air into the meringue.
  • Lower the oven temperature to 275°F and bake the macarons for an extra 2 minutes. If the macarons become too hot too quickly, the top will puff up quickly, but the bottom part doesn’t rise to produce the perfect feet that you want.


4 Comments

Pistachio White Chocolate Icing

This icing is to die for! I just want to eat all of it by myself.

(This recipe makes enough icing for 3 cupcakes or for a batch of french macarons.)

Ingredients

  •  1/2 cup icing sugar
  • 2 tbsp butter (room temperature)
  • 2 heaped tbsp white chocolate chips
  • 2 tsp milk
  • 1 1/2 tbsp ground pistachios

Directions

  1. Cream butter and icing sugar in a small bowl.
  2. In a microwave-safe bowl, melt the chocolate chips.
  3. Add the melted chocolate to the butter and sugar and mix well.
  4. Add the milk to the mixture and mix well.
  5. Fold in the pistachios.

~

If you find that the icing is still really thick, add another 1/2 tsp of milk.


Leave a comment

Honey Garlic Chicken Wings (Oh, for the love of chicken! Part II)

As soon as I hear any mention of chicken wings, my first reaction is always, “WHERE!?” I probably eat chicken wings way more often than I should, but life is short so do what makes you happy. That said, how about more eating and less talking?

Here’s my recipe for honey garlic chicken wings.

honey garlic wings

honey garlic wings

Ingredients

  • 12 chicken wings
  • 1/3 tsp salt
  • 1/3 tsp sugar
  • 1 tsp of white wine
  • a few drops of sesame oil
  • a pinch of pepper
  • 3/4 tsp of minced or puréed garlic
  • 1 tbsp soy sauce
  • 1 tbsp honey

Directions

  1. Take the first six ingredients (in green text above), mix them well in a medium bowl, and marinate overnight.
  2. Lightly grease a large wok and cook the wings on medium-high heat until golden brown. (About 10 to 12 minutes.) Stir often.
  3. Add garlic and stir well.
  4. Add soy sauce and stir well.
  5. Cover wok with a lid, leaving the wok open just a crack. Turn heat down to medium-low and allow the wings to cook for 5 minutes, stirring in between.
  6. Add honey, stir, and cover again for 5 minutes.

~

Serve with the remaining sauce drizzled on top of the wings.


Leave a comment

Pineapple Coconut Macarons

Whoever originally came up with the pineapple-coconut pairing is a freakin’ genius. I’m usually not a huge fan of coconut, but I love coconut when it’s paired with pineapple or banana. 

This time, I decided to try making tiny one-bite macarons. With this recipe, you can make lots of tiny macarons so you’ll need three large baking sheets. I piped very small rounds of macaron batter that are about the size of a quarter. They’re so cute when they’re tiny! They’re also less messy to eat too.

This slideshow requires JavaScript.

Ingredients:

Macaron shells

  • 1 cup icing sugar
  • 3/4 cup ground almonds
  • 4 tsp shredded coconut
  • 2 large egg whites
  • 3 1/2 tbsp granulated sugar

Filling

  • 2 1/2 tsp crushed canned pineapple (drained)
  • 2 tsp finely shredded coconut
  • 2 tbsp unsalted butter
  • 3/4 icing sugar

Directions:

Macaron shells

  1. Line baking sheets with parchment paper.
  2. In a food processor, process ground almonds, shredded coconut, and icing sugar for about a minute. Scrape along the inside of the food processor in between to ensure that there aren’t any large clumps and that the ingredients are mixed well.
  3. In a medium bowl, sift the almond mixture.
  4. In a small bowl (be sure to use a bowl that’s not too shallow), whisk the egg whites with a handmixer on medium-low speed for about a minute until light and fluffy.
  5. Increase the speed to medium-high and continue to whisk the egg whites until medium-stiff for about 2 minutes. (If you turn the bowl upside-down, the egg whites don’t slide out.)
  6. Gradually add granulated sugar to the egg whites while continuing to whisk on medium-high speed for another 2 minutes to achieve medium-stiff peaks.
  7. Gradually fold the egg mixture into the almond mixture, adding only about 1/3 of the egg mixture at a time.
  8. Transfer the batter into a piping bag. (Or if you’re frugal like me, you can use a medium sandwich bag instead and just cut a tiny corner of the bag to pipe.)
  9. Pipe batter onto baking sheets. (If you’re making bite-sized macarons, pipe very small rounds that are about the size of a quarter and at least 1/2 inch apart.
  10. Preheat oven to 325°F. Let the batter sit at room temperature for about 15 to 20 minutes.
  11. Turn the oven down to 300°F and put the baking sheets into the oven for 7 minutes.
  12. Rotate the baking sheets and bake for 8 minutes.
  13. Remove the baking sheets from the oven and allow the macaron shells to cool.


Filling

  1. In a small bowl, cream the icing sugar and butter. (I use a single whisk attachment on my handmixer and whisk on low speed.)
  2. Whisk in shredded coconut.
  3. Whisk in crushed pineapple.

~
Fill your macarons, and you’re done!


4 Comments

Lemon Macarons

Ahh… The refreshing tart taste of lemon! I made a large batch of lemon macarons for family and friends, and everyone loved them. Compared to the strawberry matcha macarons recipe that I’ve already shared, this lemon macaron recipe is a little less intimidating for the beginner macaron baker.

First of all, I love anything citrus. I think I’ll eventually change up this recipe to become a Citrus Blend Macaron recipe, with hints of grapefruit, lime, and orange. But for now, let’s just go with a simple lemon macaron recipe. Lemon is a very powerful fruit so you won’t need a lot of it for this recipe.

Ingredients:

Macaron shells

  • 1 cup icing sugar
  • 3/4 cup ground almonds
  • 2 large egg whites
  • 3 1/2 tbsp granulated sugar
  • lemon zest from one large lemon
  • 3 to 4 drops yellow food coloring

Lemon icing

  • 2 tbsp unsalted butter
  • 1/8 tsp vanilla extract
  • 3/4 icing sugar
  • 1 1/2 to 2 tsp lemon juice


Directions:

Macaron shells

  1. Line two medium baking sheets with parchment paper.
  2. In a food processor, process ground almonds and icing sugar for about a minute. Scrape along the inside of the food processor in between to ensure that there aren’t any large clumps and that the two ingredients are mixed well.
  3. In a medium bowl, sift the almond mixture.
  4. In a small bowl (be sure to use a bowl that’s not too shallow), whisk the egg whites with a handmixer on medium-low speed for about a minute until light and fluffy.
  5. Increase the speed to medium-high and continue to whisk the egg whites until medium-stiff for about 2 minutes. (If you turn the bowl upside-down, the egg whites don’t slide out.)
  6. Gradually add granulated sugar to the egg whites while continuing to whisk on medium-high speed for another 2 minutes.
  7. Gradually fold the egg mixture into the almond mixture, adding only about 1/3 of the egg mixture at a time.
  8. Add lemon zest and fold.
  9. Add yellow food coloring and fold again. (I use liquid food coloring, but most people recommend gel or powder-based food coloring. You should use whatever you’re comfortable with.)
  10. Transfer the batter into a piping bag. (Or if you’re frugal like me, you can use a medium sandwich bag instead and just cut a tiny corner of the bag to pipe.)
  11. Pipe batter onto baking sheets. Try to pipe small rounds that are just under 1 inch wide and at least 1/2 inch apart.
  12. Preheat oven to 325°F. Let the batter sit at room temperature for about 15 to 20 minutes.
  13. Turn the oven down to 300°F and put the baking sheets into the oven for 7 minutes.
  14. Rotate the baking sheets and bake for 8 minutes.
  15. Remove the baking sheets from the oven and allow the macaron shells to cool.


Lemon icing 
(adapted from here)

  1. In a small bowl, cream the icing sugar and butter. (I use a single whisk attachment on my handmixer and whisk on low speed.)
  2. Whisk in vanilla extract.
  3. Whisk in lemon juice.

~

Sandwich just a small dab of icing between two macaron shells – you can pipe the filling or just gently spread the filling with a spatula.

little bags of macaron goodness

little bags of macaron goodness

Enjoy!